
motomaster battery charger 11-1567 manual pdf
The MotoMaster 11-1567 charger’s user manual provides essential guidance for safe operation, detailing functions, capabilities, and warranty details for optimal battery maintenance.
Overview of the Charger
The MotoMaster 11-1567 is a versatile battery charger designed for 12-volt lead-acid batteries. This charger is suitable for a wide range of vehicles and equipment, including cars, garden tractors, snowmobiles, and motorcycles. It features multiple charge rates – 2, 4, and 8 amps – allowing users to select the optimal setting for different battery sizes and conditions.
The manual emphasizes its ability to warm or trickle charge larger batteries using the 2A rate, while higher rates are for faster charging. It’s a comprehensive tool for maximizing battery life and ensuring reliable performance, backed by a warranty for peace of mind.
Key Features and Specifications
The MotoMaster 11-1567 boasts multiple charge rates (2A, 4A, 8A) for diverse battery needs, catering to small batteries in garden tractors and motorcycles, as well as larger automotive batteries. It’s designed for 12-volt lead-acid batteries, offering compatibility across various applications.
Key features include LED indicator lights to monitor charging progress and built-in safety mechanisms. The manual details these specifications, ensuring users understand how to effectively utilize the charger’s capabilities. It also functions as a car booster, adding to its versatility and value.

Safety Precautions
The MotoMaster 11-1567 manual contains crucial safety instructions and operating advice, emphasizing the importance of following guidelines to prevent hazards.
Important Safety Instructions
Refer to the MotoMaster 11-1567 manual for comprehensive safety guidance before operating the charger. Always disconnect the charger from the power source before making any connections or adjustments to the battery. Ensure adequate ventilation during charging, as batteries can release explosive gases. Never charge damaged batteries or those that are leaking.
Avoid short-circuiting the charger terminals. Do not expose the charger to rain or excessive moisture. Always wear appropriate eye protection when working near batteries. This charger is intended for 12-volt lead-acid batteries only; using it with other battery types could cause damage or injury. Keep the charger out of reach of children.
Electrical Safety Guidelines
The MotoMaster 11-1567 manual emphasizes electrical safety; always verify the power outlet is properly grounded and matches the charger’s voltage requirements. Never operate the charger with a damaged cord or plug – replace them immediately. Avoid using extension cords unless absolutely necessary, and ensure they are of sufficient gauge to handle the charger’s current draw.
Do not immerse the charger in water or any other liquid. Disconnect the charger from the power source before cleaning or inspecting it. Never attempt to repair the charger yourself; contact a qualified technician for assistance. Ensure the charger is protected from short circuits and electrical overload.
Battery Safety Guidelines
The MotoMaster 11-1567 manual stresses battery safety: always wear appropriate eye protection (safety glasses or a face shield) when working near batteries. Batteries produce explosive gases – ensure adequate ventilation during charging. Avoid creating sparks or open flames near the battery, as this could ignite the gases.
Never charge a frozen battery. If the battery is leaking, avoid contact with the acid and neutralize any spills with baking soda and water. Disconnect the battery terminals before cleaning. Always follow the battery manufacturer’s safety recommendations as detailed in the charger’s manual.
Understanding the Charger Components
The MotoMaster 11-1567 manual details charger terminals, LED indicators, and control knobs, explaining their functions for effective and safe battery charging procedures.
Charger Terminals and Connections
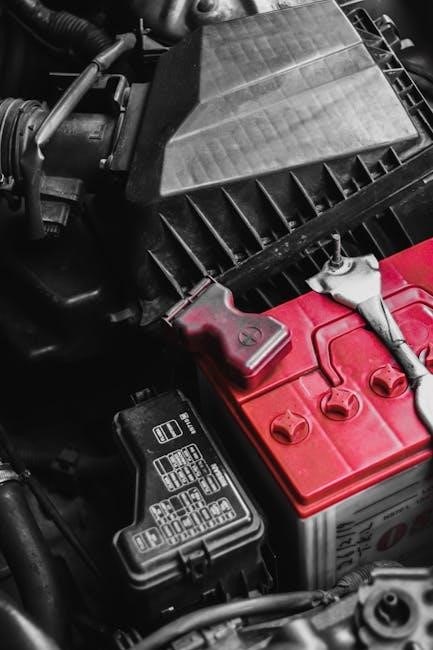
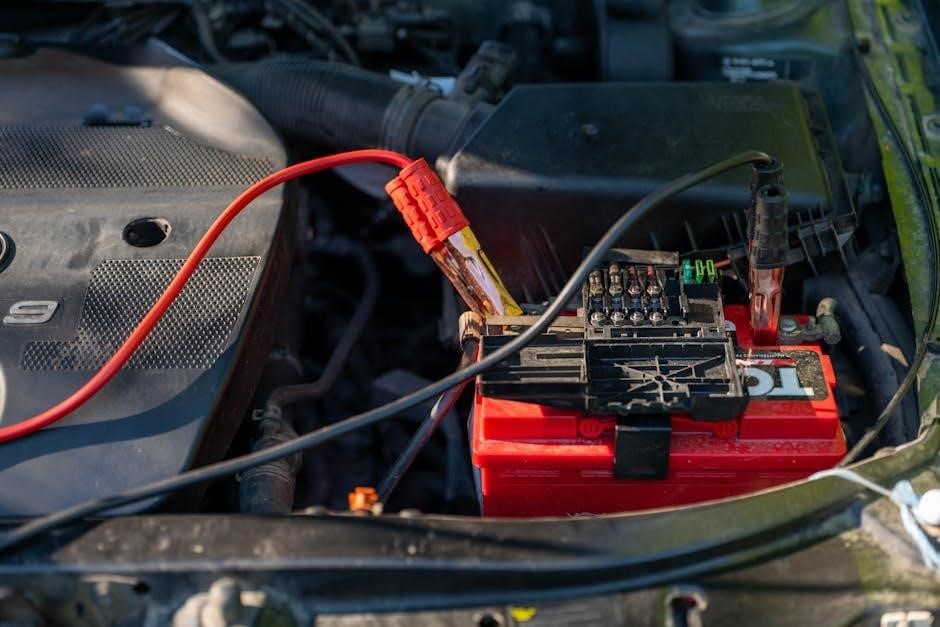
The MotoMaster 11-1567 manual meticulously outlines the charger’s terminals, crucial for establishing a secure and effective connection to the battery. It emphasizes proper polarity – red clamp to positive (+) and black clamp to negative (-). Incorrect connections can severely damage both the charger and the battery.
The manual stresses the importance of clean terminals on both the charger and the battery for optimal current flow. Corrosion can impede charging efficiency. It also details the correct method for clamping, ensuring a firm grip to prevent accidental disconnections during the charging cycle. Always disconnect the charger before making or breaking connections to avoid sparking.
LED Indicator Lights Explained
The MotoMaster 11-1567 manual dedicates a section to deciphering the LED indicator lights, vital for monitoring the charging process. Typically, a solid red light signifies charging is in progress, while a flashing red light may indicate a problem, such as reversed polarity or a faulty battery.
A solid green light usually confirms a full charge, and some models may feature an additional light to indicate maintenance or float mode. The manual stresses that understanding these indicators is key to safe and efficient battery charging, preventing overcharging or damage. Refer to the manual for specific light patterns and their meanings.
Control Knobs and Switches
The MotoMaster 11-1567 manual details the function of each control knob and switch, crucial for selecting the appropriate charging settings. Typically, a charge rate selector allows users to choose between 2, 4, and 8-amp settings, catering to different battery sizes and types.
An on/off switch initiates or terminates the charging cycle. The manual emphasizes the importance of correctly setting the charge rate based on the battery’s capacity, as outlined in the compatibility section, to avoid damage. Proper use of these controls ensures optimal charging and extends battery life.

Charging Procedures
The MotoMaster 11-1567 manual guides users through preparing the battery, connecting the charger, and selecting the correct charge rate for safe operation.
Preparing the Battery for Charging
Before connecting the MotoMaster 11-1567, the battery requires careful preparation as detailed in the manual. First, visually inspect the battery for any cracks or leaks; do not charge a damaged battery. Ensure the battery is in a well-ventilated area, away from flammable materials. Clean the battery terminals with a wire brush to remove corrosion, ensuring a good electrical connection.
Check the electrolyte level (for non-sealed batteries) and add distilled water if needed. Finally, disconnect the battery from the vehicle or device to prevent any electrical issues during the charging process, referencing the manual for specific guidance.
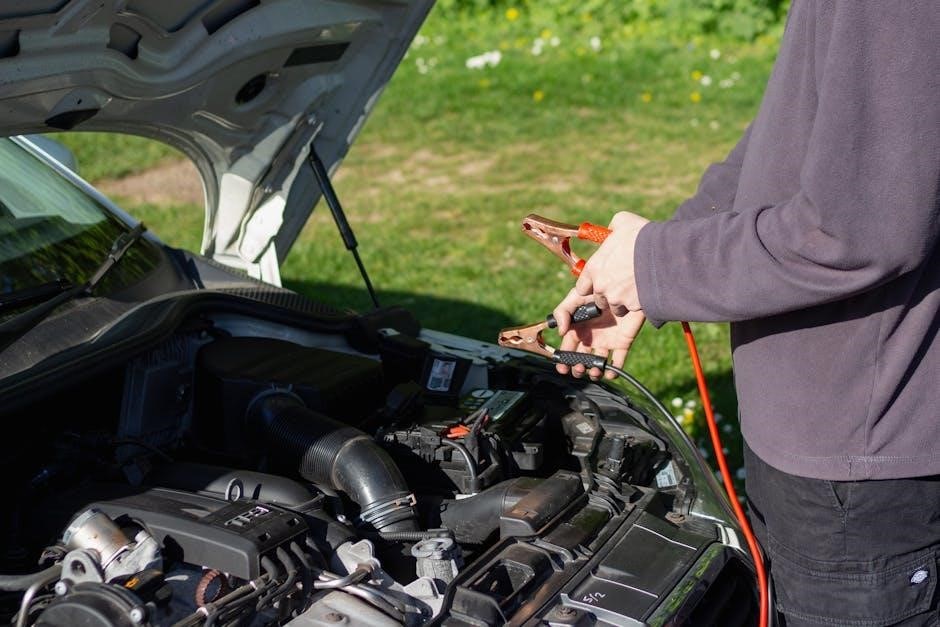
Connecting the Charger to the Battery
Refer to the MotoMaster 11-1567 manual for proper connection procedures. Begin by ensuring the charger is switched off. Attach the red (positive) clamp to the positive terminal of the battery, and the black (negative) clamp to the negative terminal. Double-check the polarity to avoid sparks or damage.
Ensure the clamps are securely fastened to the terminals. The manual emphasizes a firm connection for efficient charging. Avoid any contact between the clamps or with the vehicle chassis during the connection process, prioritizing safety throughout the procedure.
Selecting the Correct Charge Rate
The MotoMaster 11-1567 manual details selecting the appropriate charge rate based on battery size and type. For smaller batteries – garden tractors, snowmobiles, motorcycles – the 2 Amp rate is ideal for warming or trickle charging. Larger batteries benefit from the 4 or 8 Amp rates for faster charging.
Consult the manual for specific recommendations. Using the wrong rate can damage the battery or prolong charging time. Always prioritize matching the charge rate to the battery’s capacity, ensuring optimal performance and longevity as outlined in the user guide.
Charge Rate Settings
The MotoMaster 11-1567 manual explains settings for 2, 4, and 8 Amp charging, catering to diverse battery sizes and specific charging applications.
2 Amp Charge Rate – Applications
According to the MotoMaster 11-1567 manual, the 2 Amp charge rate is specifically designed for smaller batteries commonly found in garden tractors, snowmobiles, and motorcycles. This lower amperage setting is also ideal for warming or “trickle charging” larger batteries, providing a gentle charge to maintain optimal performance without overcharging. Utilizing the 2 Amp rate helps to extend battery life and prevent damage, making it a versatile option for various 12-volt lead-acid battery types. It’s a slower, more controlled charge perfect for batteries that don’t require a rapid boost.
4 Amp Charge Rate – Applications
Referencing the MotoMaster 11-1567 manual, the 4 Amp charge rate serves as a balanced option for a wider range of 12-volt lead-acid batteries. It’s suitable for moderately discharged batteries needing a quicker recharge than the 2 Amp setting provides. This rate effectively restores battery capacity without being overly aggressive, making it a good choice for general maintenance charging. The manual doesn’t explicitly detail specific applications beyond this, suggesting its versatility for automotive, marine, and recreational vehicle batteries. It offers a compromise between speed and gentle charging.
8 Amp Charge Rate – Applications
According to the MotoMaster 11-1567 manual, the 8 Amp charge rate is designed for rapidly recharging significantly discharged 12-volt lead-acid batteries. It’s best utilized for larger batteries found in vehicles like cars, trucks, and SUVs, where a quicker turnaround is desired. However, the manual cautions against prolonged use on smaller batteries, as it could lead to overcharging and potential damage. This rate is ideal when time is of the essence, but careful monitoring is crucial to prevent overheating or shortening the battery’s lifespan.
Battery Types and Compatibility
The MotoMaster 11-1567 manual confirms suitability for all 12-volt lead-acid batteries, including those used in garden tractors, snowmobiles, and motorcycles.
Lead-Acid Battery Compatibility
The MotoMaster 11-1567 battery charger is specifically designed to work with a wide range of 12-volt lead-acid batteries; This encompasses flooded, gel, and AGM (Absorbent Glass Mat) types commonly found in automotive, marine, and recreational vehicles. The charger’s manual emphasizes its ability to maximize battery life and performance when used correctly with these battery chemistries.
Proper compatibility ensures efficient charging and prevents potential damage to both the charger and the battery. Always consult the battery manufacturer’s recommendations and the MotoMaster 11-1567 manual for specific charging guidelines related to your particular lead-acid battery type.
Compatibility with Garden Tractor Batteries
The MotoMaster 11-1567 battery charger demonstrates excellent compatibility with the smaller batteries frequently used in garden tractors. The manual highlights the 2 Amp charge rate as particularly suitable for these applications, offering a gentle charge ideal for warming or trickle-charging larger batteries, including those found in garden tractors.
This lower amperage setting minimizes the risk of overcharging, which can damage these batteries. Referencing the MotoMaster 11-1567 manual PDF ensures users select the appropriate charge rate for optimal garden tractor battery maintenance and longevity, extending their operational life.
Compatibility with Snowmobile and Motorcycle Batteries
The MotoMaster 11-1567 battery charger is well-suited for maintaining the batteries in snowmobiles and motorcycles. The MotoMaster 11-1567 manual PDF specifically recommends the 2 Amp charge rate for these smaller battery types. This setting provides a controlled charge, preventing damage often associated with higher amperage settings on these sensitive battery systems.
Utilizing the 2 Amp rate ensures optimal charging without risking overcharge, extending the lifespan of snowmobile and motorcycle batteries. Always consult the manual for specific guidelines and to confirm compatibility with your particular battery type for best results.
Troubleshooting Common Issues
The MotoMaster 11-1567 manual PDF details solutions for problems like the charger not powering on, batteries failing to charge, or indicator lights malfunctioning.
Charger Not Turning On
If the MotoMaster 11-1567 battery charger fails to power on, the user manual PDF recommends first verifying the AC power source is functioning correctly. Ensure the power cord is securely plugged into both the charger and a working outlet. Next, inspect the fuse within the charger; a blown fuse will prevent operation.
The manual also suggests checking for any visible damage to the power cord or the charger itself. If these steps don’t resolve the issue, consult the troubleshooting section of the PDF for further diagnostic guidance, potentially indicating an internal fault requiring professional attention. Always prioritize safety when inspecting electrical components.
Battery Not Charging
Should the MotoMaster 11-1567 fail to charge a battery, the manual PDF advises confirming proper connection of the clamps – red to positive (+), black to negative (-). Verify the selected charge rate is appropriate for the battery’s size and type, as detailed within the manual. A low battery voltage might initially prevent charging; allow a brief period for voltage stabilization.
The PDF also instructs users to inspect the battery terminals for corrosion or damage, which can impede the charging process. If issues persist, the manual suggests testing with a different battery to isolate whether the problem lies with the charger or the battery itself.
LED Indicators Not Functioning
If the LED indicators on the MotoMaster 11-1567 aren’t illuminating, the manual PDF recommends first checking the power supply and ensuring the charger is securely plugged into a functioning outlet. A blown internal fuse could also be the culprit; the manual details its location and replacement procedure.
The PDF further suggests inspecting the charger’s internal wiring for any loose connections or damage. If the LEDs remain unresponsive after these checks, the manual advises against attempting self-repair and recommends contacting customer support or a qualified technician for assistance, potentially indicating a more significant internal fault.
Maintenance and Care
The MotoMaster 11-1567 manual PDF stresses regular cleaning, cable/clamp inspection, and proper storage to ensure longevity and optimal performance of the charger.
Cleaning the Charger
According to the MotoMaster 11-1567 manual PDF, before any cleaning procedure, always disconnect the battery charger from the power outlet. This crucial step prevents electrical shock and ensures user safety. Use a clean, dry cloth to wipe down the exterior casing of the charger, removing any dust or dirt accumulation. Avoid using water or solvents, as these can damage the internal components.
Pay particular attention to the charger terminals and clamps, ensuring they are free from corrosion. A slightly dampened cloth can be used for these areas, followed by thorough drying. Never immerse the charger in water or any other liquid. Regular cleaning maintains the charger’s efficiency and extends its lifespan, guaranteeing reliable performance for years to come;
Storing the Charger
As detailed in the MotoMaster 11-1567 manual PDF, proper storage is vital for maintaining the charger’s functionality. Before storing, ensure the unit is completely cool and dry. Disconnect the charger from the power outlet and carefully coil the cables to prevent damage. Store the charger in a clean, dry location, away from extreme temperatures and humidity.
Avoid storing it near flammable materials or corrosive substances. It’s recommended to keep the charger in its original packaging, if available, for added protection. Regularly inspect the stored charger for any signs of damage before future use, ensuring all components are in good working order for optimal performance.
Inspecting Cables and Clamps
The MotoMaster 11-1567 manual PDF emphasizes the importance of routinely inspecting cables and clamps for wear and tear. Before each use, carefully examine the cables for any cracks, fraying, or exposed wires. Check the clamps to ensure they are clean, securely attached, and free from corrosion. Damaged cables or clamps can compromise charging efficiency and pose a safety hazard.
If any damage is detected, immediately discontinue use and replace the affected components. Maintaining clean and functional cables and clamps ensures a safe and effective charging process, prolonging both the charger’s and battery’s lifespan.
Warranty Information
The MotoMaster 11-1567 manual PDF details warranty coverage, claim procedures, and important information regarding the charger’s protection against defects.
Warranty Coverage Details
Referring to the MotoMaster 11-1567 manual PDF, the warranty typically covers defects in materials and workmanship under normal use. This coverage extends for a specified period from the original purchase date, often one or two years. The warranty safeguards against failures due to manufacturing flaws, not damage resulting from misuse, accidents, or unauthorized modifications.
Specifically, the manual outlines what constitutes a valid warranty claim, emphasizing the need for proof of purchase. It also details what is not covered, such as wear and tear, or damage caused by improper charging techniques. Understanding these details, as presented in the PDF, is crucial for a smooth warranty process.
How to Claim Warranty
The MotoMaster 11-1567 manual PDF details the warranty claim process. Typically, you’ll need to present proof of purchase – a receipt or invoice – alongside a clear description of the defect. Contacting the retailer where you bought the charger is often the first step, or directly reaching out to MotoMaster’s customer support.
The manual specifies where to send the defective charger, potentially requiring prepaid shipping. Retain a tracking number for your shipment. Expect an evaluation period; the manual outlines potential repair or replacement options. Following these steps, as outlined in the PDF, ensures efficient claim resolution.
Locating the Manual (PDF)
The MotoMaster 11-1567 manual PDF is readily available online through various resources, offering comprehensive guidance for charger operation and maintenance procedures.
Online Resources for the Manual
Finding the MotoMaster 11-1567 battery charger manual PDF online is straightforward. Several websites archive user manuals, offering direct downloads for convenient access. A quick search using the model number – “MotoMaster 11-1567 manual PDF” – will yield numerous results. These resources often provide a readily accessible version of the owner’s manual, containing crucial safety instructions, operating advice, and warranty information.
Furthermore, retailers who sell the charger may also host the manual on their websites. Checking the official Canadian Tire website, or other authorized sellers, can provide a reliable source for the PDF document; Downloading the manual ensures you have immediate access to all the necessary information for safe and effective charger use.
Downloading the MotoMaster 11-1567 Manual PDF
To download the MotoMaster 11-1567 manual PDF, initiate a web search using the precise model number alongside “manual PDF”. Numerous links will appear, directing you to websites hosting the document. Exercise caution and select reputable sources to ensure a safe download. Once located, click the download link, and the PDF will typically save to your computer’s designated download folder.
Ensure your device has sufficient storage space before initiating the download. After downloading, verify the file’s integrity by opening it to confirm it’s complete and readable. Having a digital copy readily available allows for quick reference to operating instructions and safety guidelines whenever needed.